

继ESP8266/ESP32气象仪网页版-2后,这次来制作图形走势图表的版本,其实在这篇文章:# ESP32 / ESP8266将数据发布到Raspberry Pi LAMP Server中我已经讲过,只是那个版本界面比较简陋,而且是用内网的.这次其实只是这个版本的升级版,并且在这里再讲一些事项解释一下.可以点击这里看看我做的实验示例.
关于如把树莓派或者局域网内主机映射到公网,我将会另外发一篇解释HTTP POST/GET以及一些实现公网访问的文章,给小白入门扫盲一下,顺便对《ESP8266/ESP32气象仪网页版》这3篇文章做补充.
事前准备
软件 硬件 软件环境的准备详细参考:ESP8266/ESP32气象仪网页版-2
MySQL数据库的配置
其实数据库这里可以继续使用ESP8266/ESP32气象仪网页版-2中所创建的库,为了让初次接触的新手容易区分,所以这里是另外创建新的数据库和用户.在你熟悉后,可以删掉重新这个数据库和用户,并且重新新建一个和你需要的合并在一起.
-
创建/配置用于本项目的用户和数据库
配置一个数据库,进入 mysql,输入以下命令后,按提示输入你的MySQL密码:
mysql -u root -p -
为创建一个叫
espdb-2的数据库:
CREATE DATABASE espdb-2; -
为 这个数据库设置一个用户为
espuser2
CREATE USER espuser2; -
为这个
espuser2用户配置一个密码
SET PASSWORD FOR espuser2= PASSWORD("你的密码"); -
为这个
espuser2用户配置数据库:espdb-2的访问权限:
GRANT ALL PRIVILEGES ON espdb-2.* TO espuser IDENTIFIED BY"你的密码"; -
生效这些配置
FLUSH PRIVILEGES; -
然后退出 mysql
exit; -
创建SQL表
注意事项和操作流程参考:ESP8266/ESP32气象仪网页版-2,这里不再重复说明.
CREATE TABLE Sensor (
    id INT(6) UNSIGNED AUTO_INCREMENT PRIMARY KEY,
    value1 VARCHAR(10),
    value2 VARCHAR(10),
    value3 VARCHAR(10),
    reading_time TIMESTAMP DEFAULT CURRENT_TIMESTAMP ON UPDATE CURRENT_TIMESTAMP
)
至此,SQL方面的配置已经做完了,接下来SSH到你的Linux LAMP主机以继续下一步.
PHP脚本HTTP POST-将数据插入MySQL数据库
文件的创建方法和位置请参考:ESP8266/ESP32气象仪网页版-2,这里不再重复说明.
post-data.php
<?php

$servername = "localhost";
$dbname = "你的用户名";
$username = "你的数据库名称";
$password = "你的密码";

$api_key_value = "tPmAT5Ab3j7F9";

$api_key = $value1 = $value2 = $value3 = "";

if ($_SERVER["REQUEST_METHOD"] == "POST") {
    $api_key = test_input($_POST["api_key"]);
    if($api_key == $api_key_value) {
        $value1 = test_input($_POST["value1"]);
        $value2 = test_input($_POST["value2"]);
        $value3 = test_input($_POST["value3"]);

        $conn = new mysqli($servername, $username, $password, $dbname);
        if ($conn->connect_error) {
            die("Connection failed: " . $conn->connect_error);
        }

        $sql = "INSERT INTO Sensor (value1, value2, value3)
        VALUES ('" . $value1 . "', '" . $value2 . "', '" . $value3 . "')";

        if ($conn->query($sql) === TRUE) {
            echo "New record created successfully";
        }
        else {
            echo "Error: " . $sql . "<br>" . $conn->error;
        }

        $conn->close();
    }
    else {
        echo "Wrong API Key provided.";
    }

}
else {
    echo "No data posted with HTTP POST.";
}

function test_input($data) {
    $data = trim($data);
    $data = stripslashes($data);
    $data = htmlspecialchars($data);
    return $data;
} 完成后可以尝试访问该页面,在浏览器输入http://你的内网IP或者公网域名/post-data.php,正常的话可以看见一个内容只有:no data posted with HTTP POST的白板背景.
-esp-chart.php
该文件负责在网页的图表中绘制数据库的内容:
<?php

$servername = "localhost";
$dbname = "数据库名称";
$username = "用户名";
$password = "密码";

// Create connection
$conn = new mysqli($servername, $username, $password, $dbname);
// Check connection
if ($conn->connect_error) {
    die("Connection failed: " . $conn->connect_error);
}

$sql = "SELECT id, value1, value2, value3, reading_time FROM Sensor order by reading_time desc limit 40";

$result = $conn->query($sql);

while ($data = $result->fetch_assoc()){
    $sensor_data[] = $data;
}

$readings_time = array_column($sensor_data, 'reading_time');

$value1 = json_encode(array_reverse(array_column($sensor_data, 'value1')), JSON_NUMERIC_CHECK);
$value2 = json_encode(array_reverse(array_column($sensor_data, 'value2')), JSON_NUMERIC_CHECK);
$value3 = json_encode(array_reverse(array_column($sensor_data, 'value3')), JSON_NUMERIC_CHECK);
$reading_time = json_encode(array_reverse($readings_time), JSON_NUMERIC_CHECK);

/*echo $value1;
echo $value2;
echo $value3;
echo $reading_time;*/

$result->free();
$conn->close();
?>

<!DOCTYPE html>
<html>
<meta name="viewport" content="width=device-width, initial-scale=1">
  <script src="https://code.highcharts.com/highcharts.js"></script>
  <style>
    body {
      min-width: 310px;
        max-width: 1280px;
        height: 500px;
      margin: 0 auto;
    }
    h2 {
      font-family: Arial;
      font-size: 2.5rem;
      text-align: center;
    }
  </style>
  <body>
    <h2>ESP Weather Station</h2>
    <div id="chart-temperature" class="container"></div>
    <div id="chart-humidity" class="container"></div>
    <div id="chart-pressure" class="container"></div>
<script>

var value1 = <?php echo $value1; ?>;
var value2 = <?php echo $value2; ?>;
var value3 = <?php echo $value3; ?>;
var reading_time = <?php echo $reading_time; ?>;

var chartT = new Highcharts.Chart({
  chart:{ renderTo : 'chart-temperature' },
  title: { text: 'BME280 Temperature' },
  series: [{
    showInLegend: false,
    data: value1
  }],
  plotOptions: {
    line: { animation: false,
      dataLabels: { enabled: true }
    },
    series: { color: '#059e8a' }
  },
  xAxis: {
    type: 'datetime',
    categories: reading_time
  },
  yAxis: {
    title: { text: 'Temperature (Celsius)' }
    //title: { text: 'Temperature (Fahrenheit)' }
  },
  credits: { enabled: false }
});

var chartH = new Highcharts.Chart({
  chart:{ renderTo:'chart-humidity' },
  title: { text: 'BME280 Humidity' },
  series: [{
    showInLegend: false,
    data: value2
  }],
  plotOptions: {
    line: { animation: false,
      dataLabels: { enabled: true }
    }
  },
  xAxis: {
    type: 'datetime',
    //dateTimeLabelFormats: { second: '%H:%M:%S' },
    categories: reading_time
  },
  yAxis: {
    title: { text: 'Humidity (%)' }
  },
  credits: { enabled: false }
});

var chartP = new Highcharts.Chart({
  chart:{ renderTo:'chart-pressure' },
  title: { text: 'BME280 Pressure' },
  series: [{
    showInLegend: false,
    data: value3
  }],
  plotOptions: {
    line: { animation: false,
      dataLabels: { enabled: true }
    },
    series: { color: '#18009c' }
  },
  xAxis: {
    type: 'datetime',
    categories: reading_time
  },
  yAxis: {
    title: { text: 'Pressure (hPa)' }
  },
  credits: { enabled: false }
});

</script>
</body>
</html> 完成后可以尝试访问该页面,在浏览器输入http://你的内网IP或者公网域名/esp-chart.php,正常的话可以看见一个空白网页.到目前为止,PHP的配置工作已经完成了.接下开始给ESP8266/ESP32写入代码,代码中的注释和具体代码作用解释与ESP8266/ESP32气象仪网页版-2基本相同,这里不再重复提及.
ESP8266/ESP32的代码写入
#ifdef ESP32
  #include <WiFi.h>
  #include <HTTPClient.h>
#else
  #include <ESP8266WiFi.h>
  #include <ESP8266HTTPClient.h>
  #include <WiFiClient.h>
#endif

#include <Wire.h>
#include <Adafruit_Sensor.h>
#include <Adafruit_BME280.h>

const char* ssid     = "你的WiFi SSID";
const char* password = "你的WiFi密码";

const char* serverName = "http://你的内网IP或者公网域名/post-data.php";

String apiKeyValue = "tPmAT5Ab3j7F9";

Adafruit_BME280 bme;  // I2C

void setup() {
  Serial.begin(115200);

  WiFi.begin(ssid, password);
  Serial.println("Connecting");
  while(WiFi.status() != WL_CONNECTED) {
    delay(500);
    Serial.print(".");
  }
  Serial.println("");
  Serial.print("Connected to WiFi network with IP Address: ");
  Serial.println(WiFi.localIP());

  bool status = bme.begin(0x76);
  if (!status) {
    Serial.println("Could not find a valid BME280 sensor, check wiring or change I2C address!");
    while (1);
  }
}

void loop() {

  if(WiFi.status()== WL_CONNECTED){
    HTTPClient http;

    http.begin(serverName);

    http.addHeader("Content-Type", "application/x-www-form-urlencoded");

    String httpRequestData = "api_key=" + apiKeyValue + "&value1=" + String(bme.readTemperature())
                           + "&value2=" + String(bme.readHumidity()) + "&value3=" + String(bme.readPressure()/100.0F) + "";
    Serial.print("httpRequestData: ");
    Serial.println(httpRequestData);

    int httpResponseCode = http.POST(httpRequestData);

    if (httpResponseCode>0) {
      Serial.print("HTTP Response code: ");
      Serial.println(httpResponseCode);
    }
    else {
      Serial.print("Error code: ");
      Serial.println(httpResponseCode);
    }

    http.end();
  }
  else {
    Serial.println("WiFi Disconnected");
  }

  delay(30000);
}
运行效果
电脑端浏览器效果

手机端浏览器效果
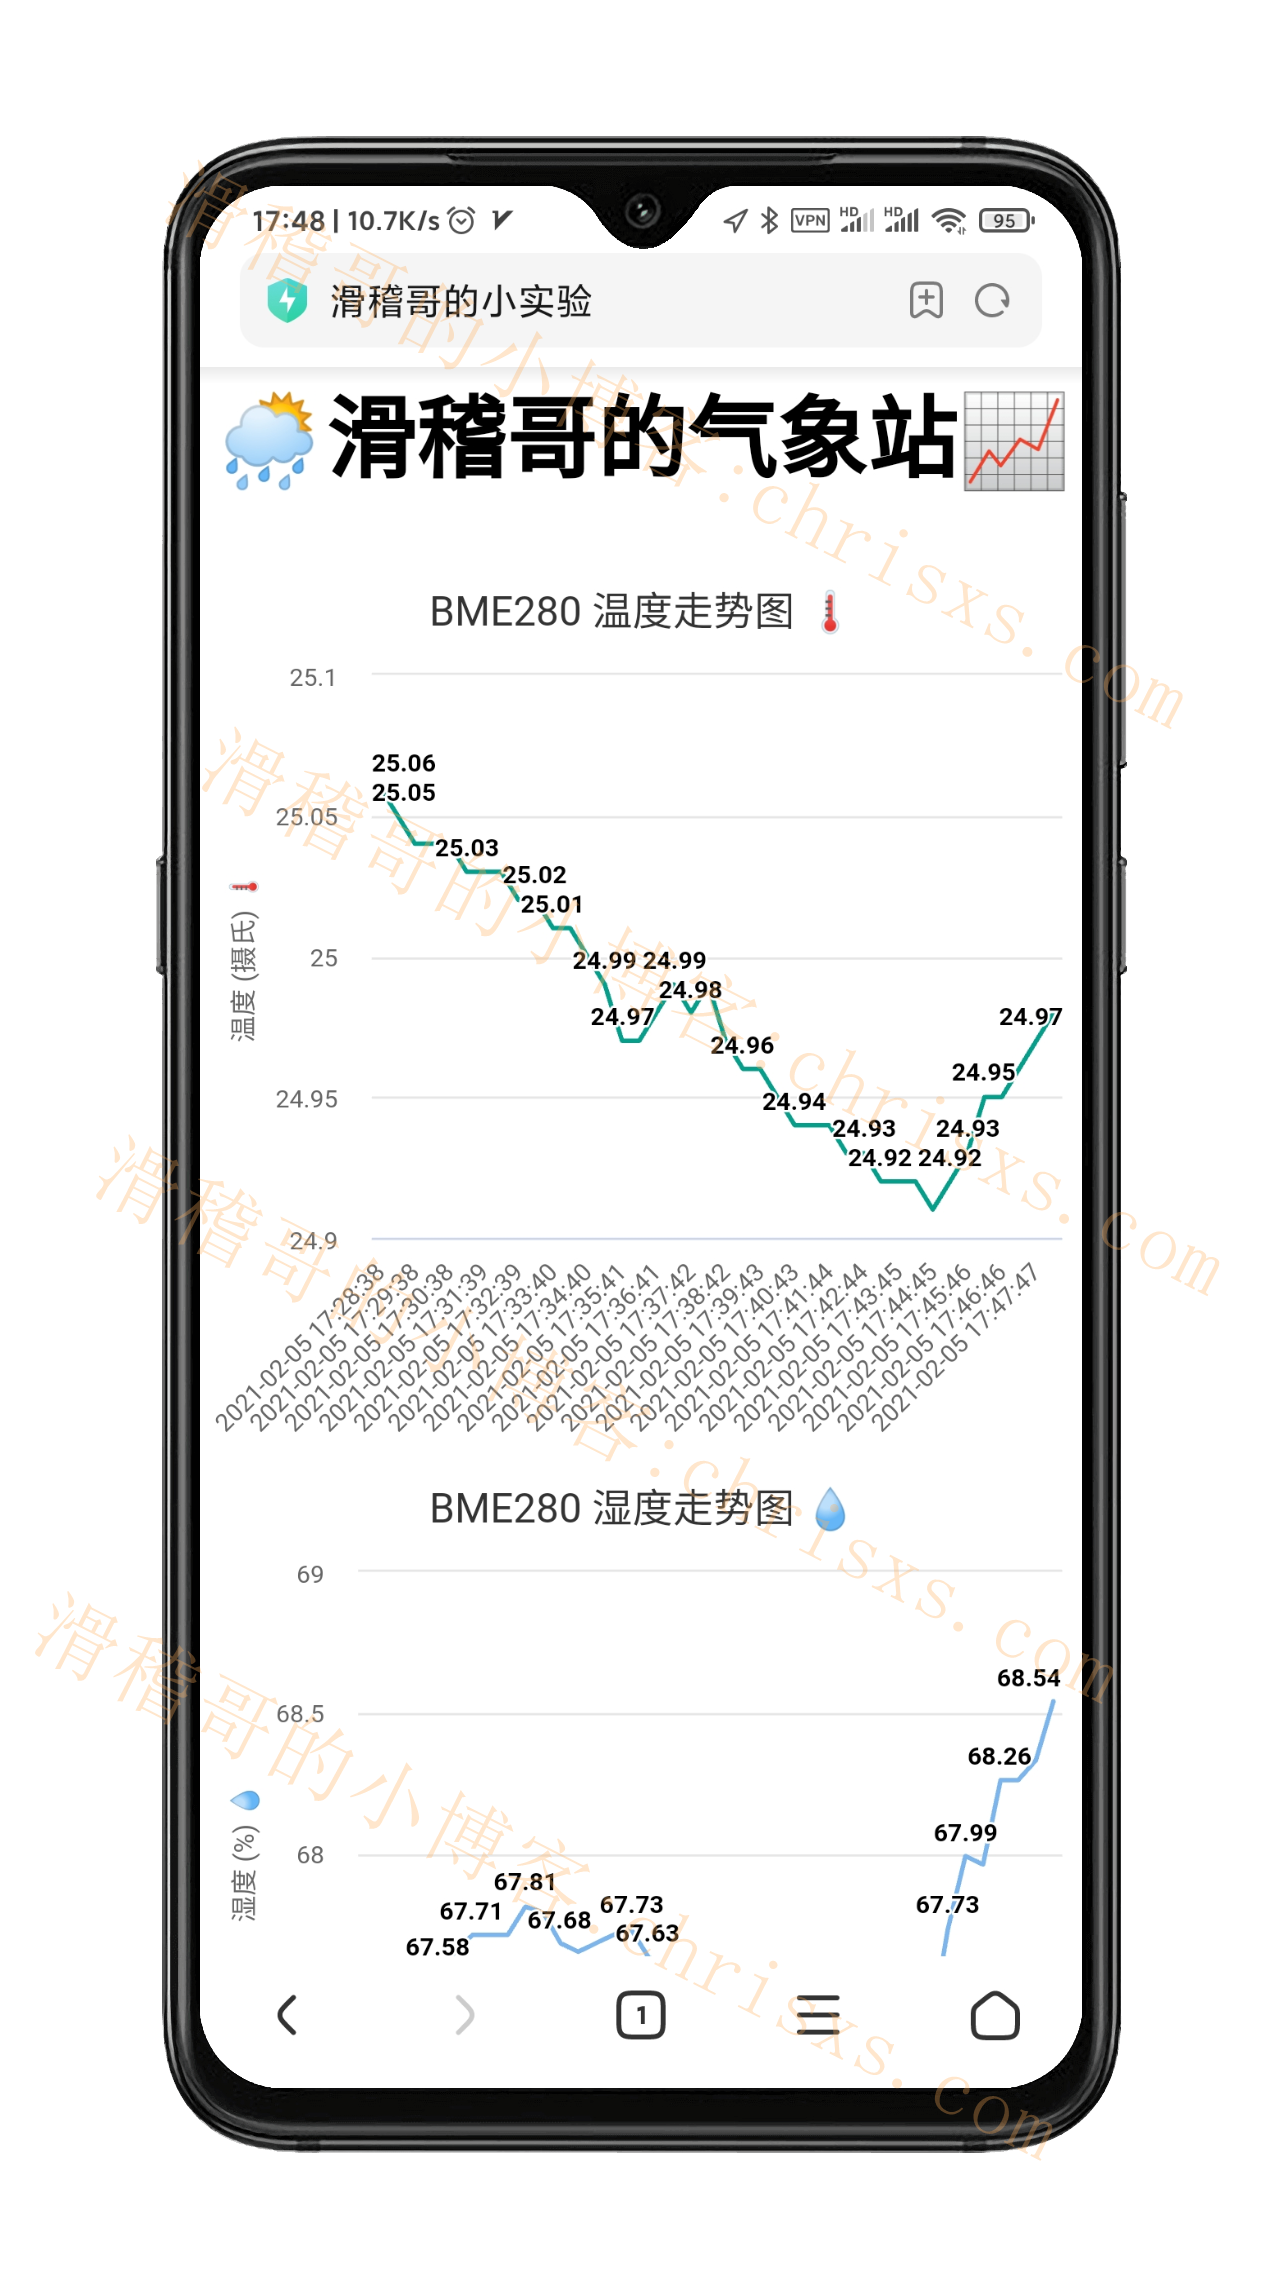
在手机端,点击数据后是可以滑动的