在[上一篇](https://chrisxs.com/index.php/jishu/ec68bxp10w9ycsmd/ "上一篇")后,接下载讲讲关于图形指针的web界面.这里实施的方式为ESP8266读取BME280的值,可以通过访问自己的服务器域名来查看可视化数据.示例[点击这里](https://chrisxs.com/esp-weather-station.php "点击这里"),大致流程如下:
- ESP8266/32连接WiFi,通过互联网将传感器读数发送到你私有的服务器;
- 服务器中,有一个php脚本,让读数存储在MySQL数据库中;
- 最后通过访问自己的域名来查看读数。
事前准备
首先要有一台已经搭建好LAMP的Linux服务器,最好是云主机,没有的话可以用内网任意一台Linux主机,还没有搭建好的可以看看这个链接参考一下,然后再继续下面的步骤.
创建MySQL数据库和用户
树莓派或者其他Linux发行版的MySQL使用方法是大同小异的,这里不再从基本说起,具体可以百度一下,现在只着重讲讲用户和数据库的创建,后面会讲讲phpmyadmin中的配置流程.
- 新建一个名为
espdb的数据库
CREATE DATABASE wordpress; - 新建一个名为
espuser的用户并设置该用户的密码
create user 'espuser'@'localhost' IDENTIFIED BY '你的密码'; - 给
espuser这个用户赋予espdb数据库的权限
GRANT ALL PRIVILEGES ON espdb.* TO 'espuser'@'localhost' IDENTIFIED BY '你的密码'; - 应用配置,输入
FLUSH PRIVILEGES;后退出
核对一下刚才所创建的项目:
- 数据库:
espdb - 用户名:
espuser - 用户密码:
你的密码
配置MySQL数据库
-
使用上一节中所创建的用户名
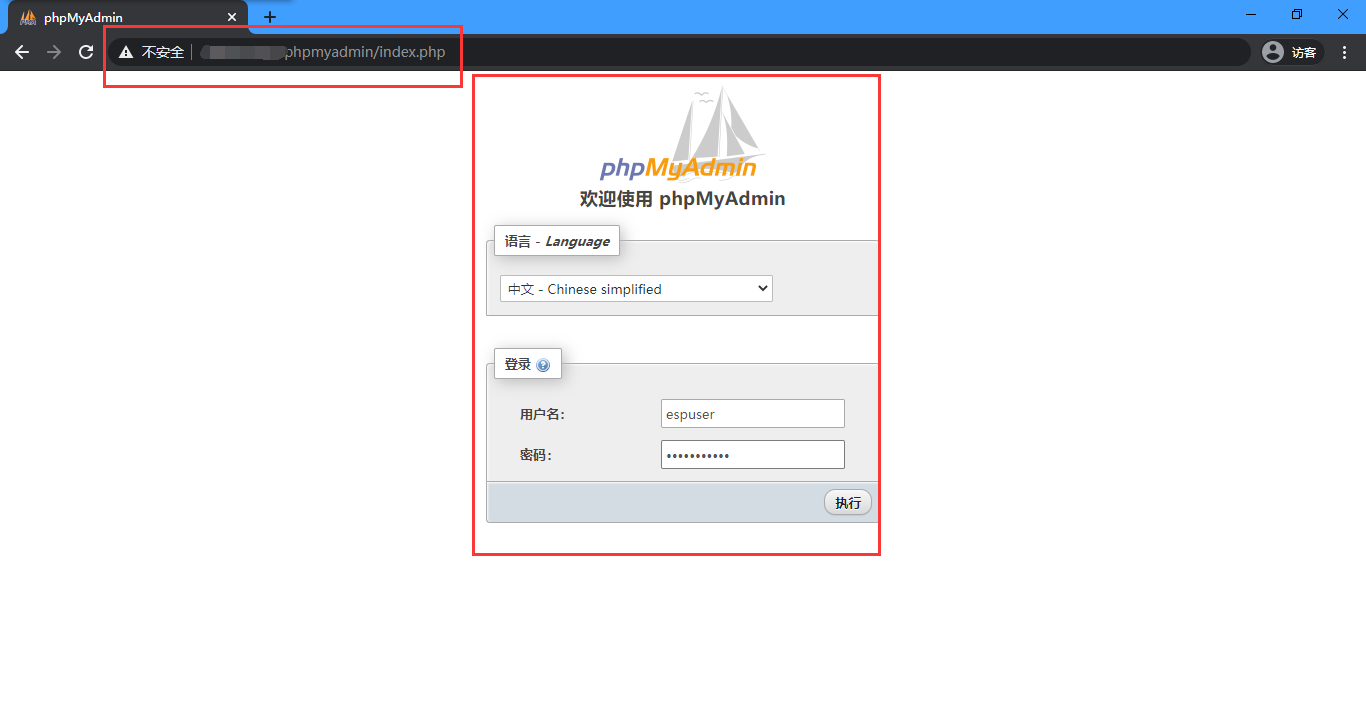
espuser和密码进入phpmyadmin并登录:

-
创建一个SQL表
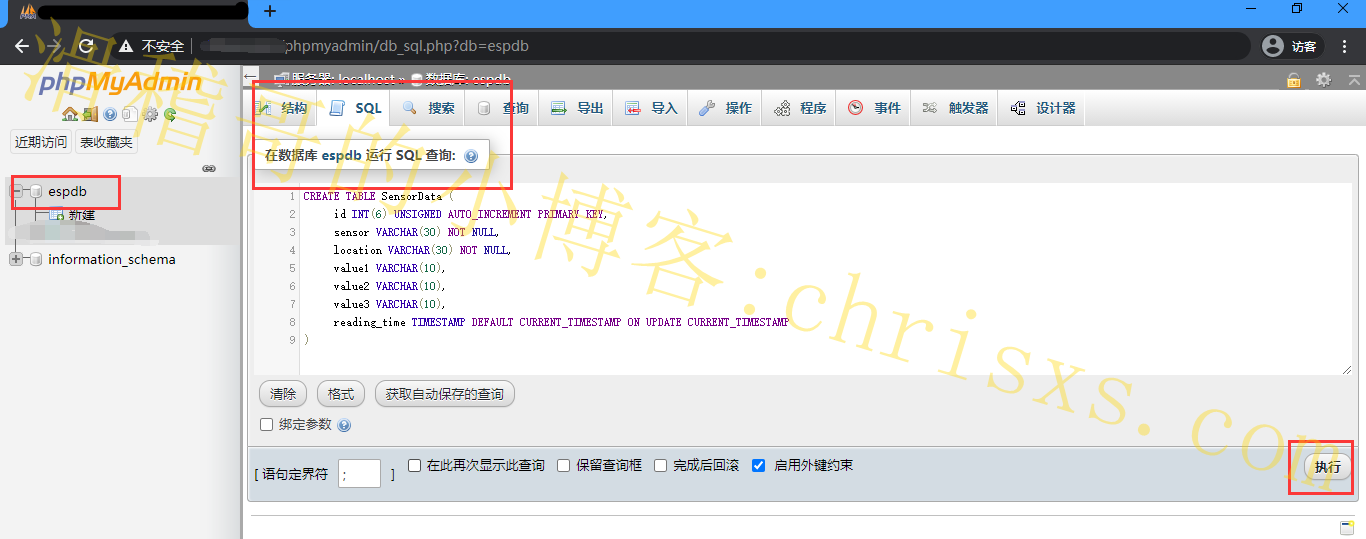
在左侧边栏中,选择数据库名称espdb并打开“ SQL”选项卡。

确保已打开espdb数据库。然后再单击“ SQL”选项卡。确定确切步骤并运行SQL查询,不然你会可能在错误的数据库中创建了一个表。
复制以下内容后,点击"执行"
CREATE TABLE SensorData (
    id INT(6) UNSIGNED AUTO_INCREMENT PRIMARY KEY,
    sensor VARCHAR(30) NOT NULL,
    location VARCHAR(30) NOT NULL,
    value1 VARCHAR(10),
    value2 VARCHAR(10),
    value3 VARCHAR(10),
    reading_time TIMESTAMP DEFAULT CURRENT_TIMESTAMP ON UPDATE CURRENT_TIMESTAMP
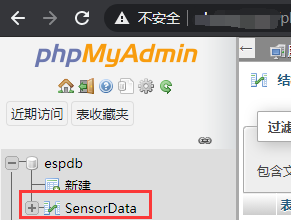
) 完成后,你应该会在左侧看到一个已经被新建的表,名为:SensorData
PHP脚本HTTP POST –在MySQL数据库中接收和插入数据
接下来,回到Linux主机端的SSH操作,创建一个PHP脚本,负责接收来自ESP32或ESP8266的传入请求,并将数据插入MySQL数据库中。这里建议在Windows中使用notepad++编辑好PHP文件后,再用finalshell xftp之类的工具上传到树莓派.如果你是使用树莓派(或其他Linux),并且还没解锁和登录root用户而进行SSH连接的,最好先解锁和设置好获取root用户权限再连接ssh到树莓派,否则接下来操作有些麻烦(VIM使用熟练的可以无视).
-
在你的Apache2制定的网页目录(默认是
/var/www/html)中创建名为esp-post-data.php的脚本,内容如下:<?php include_once('esp-database.php'); // 这个APIKEY是随机生成的,可以去https://suijimimashengcheng.bmcx.com自行生成一个,建议第一次做先直接按示例做,否则你需要在ESP的代码中填入相同的APIKEY $api_key_value = "fyyx0p260ju5d"; $api_key= $sensor = $location = $value1 = $value2 = $value3 = ""; if ($_SERVER["REQUEST_METHOD"] == "POST") { $api_key = test_input($_POST["api_key"]); if($api_key == $api_key_value) { $sensor = test_input($_POST["sensor"]); $location = test_input($_POST["location"]); $value1 = test_input($_POST["value1"]); $value2 = test_input($_POST["value2"]); $value3 = test_input($_POST["value3"]); $result = insertReading($sensor, $location, $value1, $value2, $value3); echo $result; } else { echo "Wrong API Key provided."; } } else { echo "No data posted with HTTP POST."; } function test_input($data) { $data = trim($data); $data = stripslashes($data); $data = htmlspecialchars($data); return $data; } -
数据库PHP功能脚本
在上一步中的相同目录中创建名为esp-database.php的脚本,内容如下:<?php $servername = "localhost"; // 刚才创建的数据库名 $dbname = "espdb"; // 刚才创建的数据库用户名 $username = "espuser"; // espuser的用户密码 $password = "用户密码"; function insertReading($sensor, $location, $value1, $value2, $value3) { global $servername, $username, $password, $dbname; // Create connection $conn = new mysqli($servername, $username, $password, $dbname); // Check connection if ($conn->connect_error) { die("Connection failed: " . $conn->connect_error); } $sql = "INSERT INTO SensorData (sensor, location, value1, value2, value3) VALUES ('" . $sensor . "', '" . $location . "', '" . $value1 . "', '" . $value2 . "', '" . $value3 . "')"; if ($conn->query($sql) === TRUE) { return "New record created successfully"; } else { return "Error: " . $sql . "<br>" . $conn->error; } $conn->close(); } function getAllReadings($limit) { global $servername, $username, $password, $dbname; // Create connection $conn = new mysqli($servername, $username, $password, $dbname); // Check connection if ($conn->connect_error) { die("Connection failed: " . $conn->connect_error); } $sql = "SELECT id, sensor, location, value1, value2, value3, reading_time FROM SensorData order by reading_time desc limit " . $limit; if ($result = $conn->query($sql)) { return $result; } else { return false; } $conn->close(); } function getLastReadings() { global $servername, $username, $password, $dbname; // Create connection $conn = new mysqli($servername, $username, $password, $dbname); // Check connection if ($conn->connect_error) { die("Connection failed: " . $conn->connect_error); } $sql = "SELECT id, sensor, location, value1, value2, value3, reading_time FROM SensorData order by reading_time desc limit 1" ; if ($result = $conn->query($sql)) { return $result->fetch_assoc(); } else { return false; } $conn->close(); } function minReading($limit, $value) { global $servername, $username, $password, $dbname; // Create connection $conn = new mysqli($servername, $username, $password, $dbname); // Check connection if ($conn->connect_error) { die("Connection failed: " . $conn->connect_error); } $sql = "SELECT MIN(" . $value . ") AS min_amount FROM (SELECT " . $value . " FROM SensorData order by reading_time desc limit " . $limit . ") AS min"; if ($result = $conn->query($sql)) { return $result->fetch_assoc(); } else { return false; } $conn->close(); } function maxReading($limit, $value) { global $servername, $username, $password, $dbname; // Create connection $conn = new mysqli($servername, $username, $password, $dbname); // Check connection if ($conn->connect_error) { die("Connection failed: " . $conn->connect_error); } $sql = "SELECT MAX(" . $value . ") AS max_amount FROM (SELECT " . $value . " FROM SensorData order by reading_time desc limit " . $limit . ") AS max"; if ($result = $conn->query($sql)) { return $result->fetch_assoc(); } else { return false; } $conn->close(); } function avgReading($limit, $value) { global $servername, $username, $password, $dbname; // Create connection $conn = new mysqli($servername, $username, $password, $dbname); // Check connection if ($conn->connect_error) { die("Connection failed: " . $conn->connect_error); } $sql = "SELECT AVG(" . $value . ") AS avg_amount FROM (SELECT " . $value . " FROM SensorData order by reading_time desc limit " . $limit . ") AS avg"; if ($result = $conn->query($sql)) { return $result->fetch_assoc(); } else { return false; } $conn->close(); } ?>添加数据库名称,用户名和密码后,保存文件并继续,如果你尝试在你的域名URL路径中访问,如:
http://你的内网IP或者公网域名/esp-post-data.php则会看到以只有No data posted with HTTP POST.这个内容的网页.
PHP脚本–在量规和图形仪表上显示数据库读数
继续在同一目录下,添加CSS文件来设置仪表板样式,并将其命名为esp-style.css,内容如下:
body {
    width: 60%;
    margin: auto;
    text-align: center;
    font-family: Arial;
    top: 50%;
    left: 50%;
}

@media screen and (max-width: 800px) {
    body {
        width: 100%;
    }
}

table {
    margin-left: auto;
    margin-right: auto;
}

div {
    margin-left: auto;
    margin-right: auto;
}

h2 { font-size: 2.5rem; }

.header {
     padding: 1rem;
     margin: 0 0 2rem 0;
     background: #f2f2f2;
}

h1 {
    font-size: 2rem;
    font-family: Arial, sans-serif;
    text-align: center;
    text-transform: uppercase;
}

.content {
    display: flex;
}

@media screen and (max-width: 500px) /* Mobile */ {
    .content {
        flex-direction: column;
    }
}

.mask {
    position: relative;
    overflow: hidden;
    display: block;
    width: 12.5rem;
    height: 6.25rem;
    margin: 1.25rem;
}

.semi-circle {
    position: relative;
    display: block;
    width: 12.5rem;
    height: 6.25rem;
    background: linear-gradient(to right, #3498db 0%, #05b027 33%, #f1c40f 70%, #c0392b 100%);
    border-radius: 50% 50% 50% 50% / 100% 100% 0% 0%;
}

.semi-circle::before {
    content: "";
    position: absolute;
    bottom: 0;
    left: 50%;
    z-index: 2;
    display: block;
    width: 8.75rem;
    height: 4.375rem;
    margin-left: -4.375rem;
    background: #fff;
    border-radius: 50% 50% 50% 50% / 100% 100% 0% 0%;
}

.semi-circle--mask {
    position: absolute;
    top: 0;
    left: 0;
    width: 12.5rem;
    height: 12.5rem;
    background: transparent;
    transform: rotate(120deg) translate3d(0, 0, 0);
    transform-origin: center center;
    backface-visibility: hidden;
    transition: all 0.3s ease-in-out;
}

.semi-circle--mask::before {
    content: "";
    position: absolute;
    top: 0;
    left: 0%;
    z-index: 2;
    display: block;
    width: 12.625rem;
    height: 6.375rem;
    margin: -1px 0 0 -1px;
    background: #f2f2f2;
    border-radius: 50% 50% 50% 50% / 100% 100% 0% 0%;
}

.gauge--2 .semi-circle { background: #3498db; }

.gauge--2 .semi-circle--mask { transform: rotate(20deg) translate3d(0, 0, 0); }

#tableReadings { border-collapse: collapse; }

#tableReadings td, #tableReadings th {
    border: 1px solid #ddd;
    padding: 10px;
}

#tableReadings tr:nth-child(even){ background-color: #f2f2f2; }

#tableReadings tr:hover { background-color: #ddd; }

#tableReadings th {
    padding: 10px;
    background-color: #2f4468;
    color: white;
} 紧接着,新建一个网页名为esp-weather-station.php,内容如下:
<?php
    include_once('esp-database.php');
    if ($_GET["readingsCount"]){
      $data = $_GET["readingsCount"];
      $data = trim($data);
      $data = stripslashes($data);
      $data = htmlspecialchars($data);
      $readings_count = $_GET["readingsCount"];
    }
    // 默认计次数 20
    else {
      $readings_count = 20;
    }

    $last_reading = getLastReadings();
    $last_reading_temp = $last_reading["value1"];
    $last_reading_humi = $last_reading["value2"];
    $last_reading_time = $last_reading["reading_time"];

    $min_temp = minReading($readings_count, 'value1');
    $max_temp = maxReading($readings_count, 'value1');
    $avg_temp = avgReading($readings_count, 'value1');

    $min_humi = minReading($readings_count, 'value2');
    $max_humi = maxReading($readings_count, 'value2');
    $avg_humi = avgReading($readings_count, 'value2');
?>

<!DOCTYPE html>
<html>
    <head><meta http-equiv="Content-Type" content="text/html; charset=utf-8">

        <link rel="stylesheet" type="text/css" href="esp-style.css">
        <meta name="viewport" content="width=device-width, initial-scale=1">
        <script src="https://ajax.googleapis.com/ajax/libs/jquery/3.4.1/jquery.min.js"></script>
    </head>
    <header class="header">
        <h1>📊 ESP Weather Station</h1>
        <form method="get">
            <input type="number" name="readingsCount" min="1" placeholder="Number of readings (<?php echo $readings_count; ?>)">
            <input type="submit" value="UPDATE">
        </form>
    </header>
<body>
    <p>Last reading: <?php echo $last_reading_time; ?></p>
    <section class="content">
        <div class="box gauge--1">
        <h3>TEMPERATURE</h3>
              <div class="mask">
              <div class="semi-circle"></div>
              <div class="semi-circle--mask"></div>
            </div>
            <p style="font-size: 30px;" id="temp">--</p>
            <table cellspacing="5" cellpadding="5">
                <tr>
                    <th colspan="3">Temperature <?php echo $readings_count; ?> readings</th>
                </tr>
                <tr>
                    <td>Min</td>
                    <td>Max</td>
                    <td>Average</td>
                </tr>
                <tr>
                    <td><?php echo $min_temp['min_amount']; ?> °C</td>
                    <td><?php echo $max_temp['max_amount']; ?> °C</td>
                    <td><?php echo round($avg_temp['avg_amount'], 2); ?> °C</td>
                </tr>
            </table>
        </div>
        <div class="box gauge--2">
            <h3>HUMIDITY</h3>
            <div class="mask">
                <div class="semi-circle"></div>
                <div class="semi-circle--mask"></div>
            </div>
            <p style="font-size: 30px;" id="humi">--</p>
            <table cellspacing="5" cellpadding="5">
                <tr>
                    <th colspan="3">Humidity <?php echo $readings_count; ?> readings</th>
                </tr>
                <tr>
                    <td>Min</td>
                    <td>Max</td>
                    <td>Average</td>
                </tr>
                <tr>
                    <td><?php echo $min_humi['min_amount']; ?> %</td>
                    <td><?php echo $max_humi['max_amount']; ?> %</td>
                    <td><?php echo round($avg_humi['avg_amount'], 2); ?> %</td>
                </tr>
            </table>
        </div>
    </section>
<?php
    echo   '<h2> View Latest ' . $readings_count . ' Readings</h2>
            <table cellspacing="5" cellpadding="5" id="tableReadings">
                <tr>
                    <th>ID</th>
                    <th>Sensor</th>
                    <th>Location</th>
                    <th>Value 1</th>
                    <th>Value 2</th>
                    <th>Value 3</th>
                    <th>Timestamp</th>
                </tr>';

    $result = getAllReadings($readings_count);
        if ($result) {
        while ($row = $result->fetch_assoc()) {
            $row_id = $row["id"];
            $row_sensor = $row["sensor"];
            $row_location = $row["location"];
            $row_value1 = $row["value1"];
            $row_value2 = $row["value2"];
            $row_value3 = $row["value3"];
            $row_reading_time = $row["reading_time"];
            // Uncomment to set timezone to - 1 hour (you can change 1 to any number)
            //$row_reading_time = date("Y-m-d H:i:s", strtotime("$row_reading_time - 1 hours"));
            // Uncomment to set timezone to + 7 hours (you can change 7 to any number)
            //$row_reading_time = date("Y-m-d H:i:s", strtotime("$row_reading_time + 7 hours"));

            echo '<tr>
                    <td>' . $row_id . '</td>
                    <td>' . $row_sensor . '</td>
                    <td>' . $row_location . '</td>
                    <td>' . $row_value1 . '</td>
                    <td>' . $row_value2 . '</td>
                    <td>' . $row_value3 . '</td>
                    <td>' . $row_reading_time . '</td>
                  </tr>';
        }
        echo '</table>';
        $result->free();
    }
?>

<script>
    var value1 = <?php echo $last_reading_temp; ?>;
    var value2 = <?php echo $last_reading_humi; ?>;
    setTemperature(value1);
    setHumidity(value2);

    function setTemperature(curVal){
        //set range for Temperature in Celsius -5 Celsius to 38 Celsius
        var minTemp = -5.0;
        var maxTemp = 38.0;
        //set range for Temperature in Fahrenheit 23 Fahrenheit to 100 Fahrenheit
        //var minTemp = 23;
        //var maxTemp = 100;

        var newVal = scaleValue(curVal, [minTemp, maxTemp], [0, 180]);
        $('.gauge--1 .semi-circle--mask').attr({
            style: '-webkit-transform: rotate(' + newVal + 'deg);' +
            '-moz-transform: rotate(' + newVal + 'deg);' +
            'transform: rotate(' + newVal + 'deg);'
        });
        $("#temp").text(curVal + ' ºC');
    }

    function setHumidity(curVal){
        //set range for Humidity percentage 0 % to 100 %
        var minHumi = 0;
        var maxHumi = 100;

        var newVal = scaleValue(curVal, [minHumi, maxHumi], [0, 180]);
        $('.gauge--2 .semi-circle--mask').attr({
            style: '-webkit-transform: rotate(' + newVal + 'deg);' +
            '-moz-transform: rotate(' + newVal + 'deg);' +
            'transform: rotate(' + newVal + 'deg);'
        });
        $("#humi").text(curVal + ' %');
    }

    function scaleValue(value, from, to) {
        var scale = (to[1] - to[0]) / (from[1] - from[0]);
        var capped = Math.min(from[1], Math.max(from[0], value)) - from[0];
        return ~~(capped * scale + to[0]);
    }
</script>
</body>
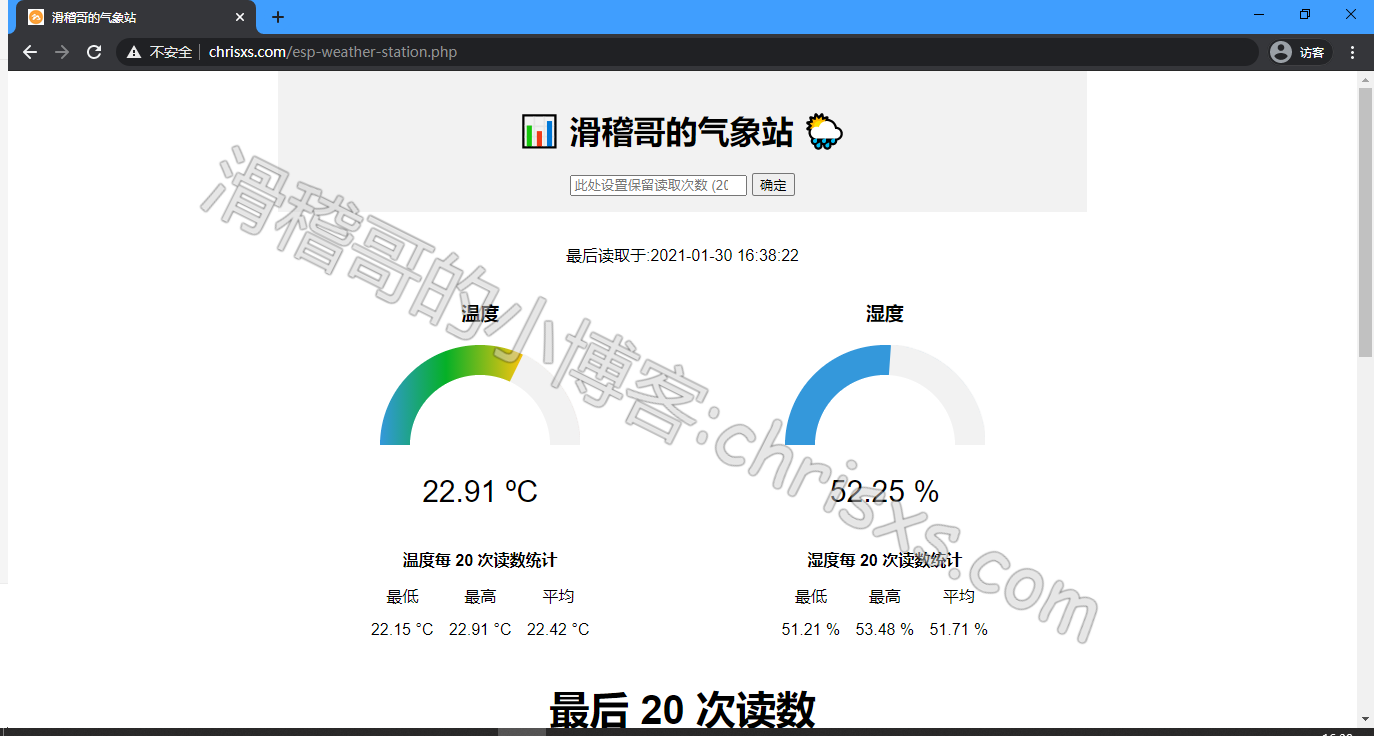
</html> 然后尝试访问http://你的内网IP或者公网域名/esp-weather-station.php,正常的话你将会看见一个和我的以下图中类似的页面,只是这里的你的实际网页为英文,并且没有出现读数,这是正常的(因为你还没写ESP的代码呢 ![]() ).到此为止服务器的PHP MySQL已经部署好了,接着我们来写ESP的代码接入你的域名.
).到此为止服务器的PHP MySQL已经部署好了,接着我们来写ESP的代码接入你的域名.
ESP8266/32代码写入
准备事项跟上一章:ESP8266气象仪网页版-1一样,这里就直接开始写代码了.
代码:
//这里会自动因应你选用ESP8266/ESP32而加载库
#ifdef ESP32
  #include <WiFi.h>
  #include <HTTPClient.h>
#else
  #include <ESP8266WiFi.h>
  #include <ESP8266HTTPClient.h>
  #include <WiFiClient.h>
#endif

#include <Wire.h>
#include <Adafruit_Sensor.h>
#include <Adafruit_BME280.h>

const char* ssid = "你的WiFiSSID";
const char* password = "你的WiFi密码";

//这里是你的内网IP或者公网域名
const char* serverName = "http://你的内网IP或者公网域名/esp-post-data.php";

// 最好这里的APIKEY: fyyx0p260ju5d 不要改,因为要与上文中的PHP中的APIKEY相同
// 如果你在这里或者PHP文件里改了APIKEY,记得要核对两边是否一致
String apiKeyValue = "fyyx0p260ju5d";
String sensorName = "BME280";
String sensorLocation = "Office";

//这里的海平面大气压设置成适合你所在使用地区的,本篇可以无视,因为我没有做大气压的显示
#define SEALEVELPRESSURE_HPA (1013.25)

Adafruit_BME280 bme;

unsigned long lastTime = 0;
unsigned long timerDelay = 30000;

void setup() {
//串口将打印当WiFi成功连接到你的路由串口将输出你的IP地址
  Serial.begin(115200);
  WiFi.begin(ssid, password);
  Serial.println("Connecting");
  while(WiFi.status() != WL_CONNECTED) {
    delay(500);
    Serial.print(".");
  }
  Serial.println("");
  Serial.print("Connected to WiFi network with IP Address: ");
  Serial.println(WiFi.localIP());

  // 如果BEM280连接失败则会显示的串口文本信息,你也可以使用bme.begin(0x76)直接跳过
  bool status = bme.begin(0x76);
  if (!status) {
    Serial.println("Could not find a valid BME280 sensor, check wiring or change I2C address!");
    while (1);
  }

  Serial.println("Timer set to 30 seconds (timerDelay variable), it will take 30 seconds before publishing the first reading.");
}

void loop() {
  //每十分钟发送一次POST请求
  if ((millis() - lastTime) > timerDelay) {
    //检查WiFi连接状态
    if(WiFi.status()== WL_CONNECTED){
      HTTPClient http;

      // 你的域名
      http.begin(serverName);

      // 指定内容类型标题
      http.addHeader("Content-Type", "application/x-www-form-urlencoded");

      // 准备你的HTTP POST 请求数据
      String httpRequestData = "api_key=" + apiKeyValue + "&sensor=" + sensorName
                            + "&location=" + sensorLocation + "&value1=" + String(bme.readTemperature())
                            + "&value2=" + String(bme.readHumidity()) + "&value3=" + String(bme.readPressure()/100.0F) + "";
      Serial.print("httpRequestData: ");
      Serial.println(httpRequestData);

      // 您可以在上面注释httpRequestData变量
      // 然后,使用下面的httpRequestData变量(出于测试目的,不经过BME280传感器)
      //String httpRequestData = "api_key=fyyx0p260ju5d&sensor=BME280&location=Office&value1=24.75&value2=49.54&value3=1005.14";

      // 发送 HTTP POST 请求
      int httpResponseCode = http.POST(httpRequestData);

      if (httpResponseCode>0) {
        Serial.print("HTTP Response code: ");
        Serial.println(httpResponseCode);
      }
      else {
        Serial.print("Error code: ");
        Serial.println(httpResponseCode);
      }
      // 释放资源
      http.end();
    }
    else {
      Serial.println("WiFi Disconnected");
    }
    lastTime = millis();
  }
}
运行效果:
实际效果可以打开我做的样本:https://chrisxs.com/esp-weather-station.php,有时候我可能会拿来做实验把它拆走,所以偶尔发现是没有数据传入的,正常是每30秒发送一次.
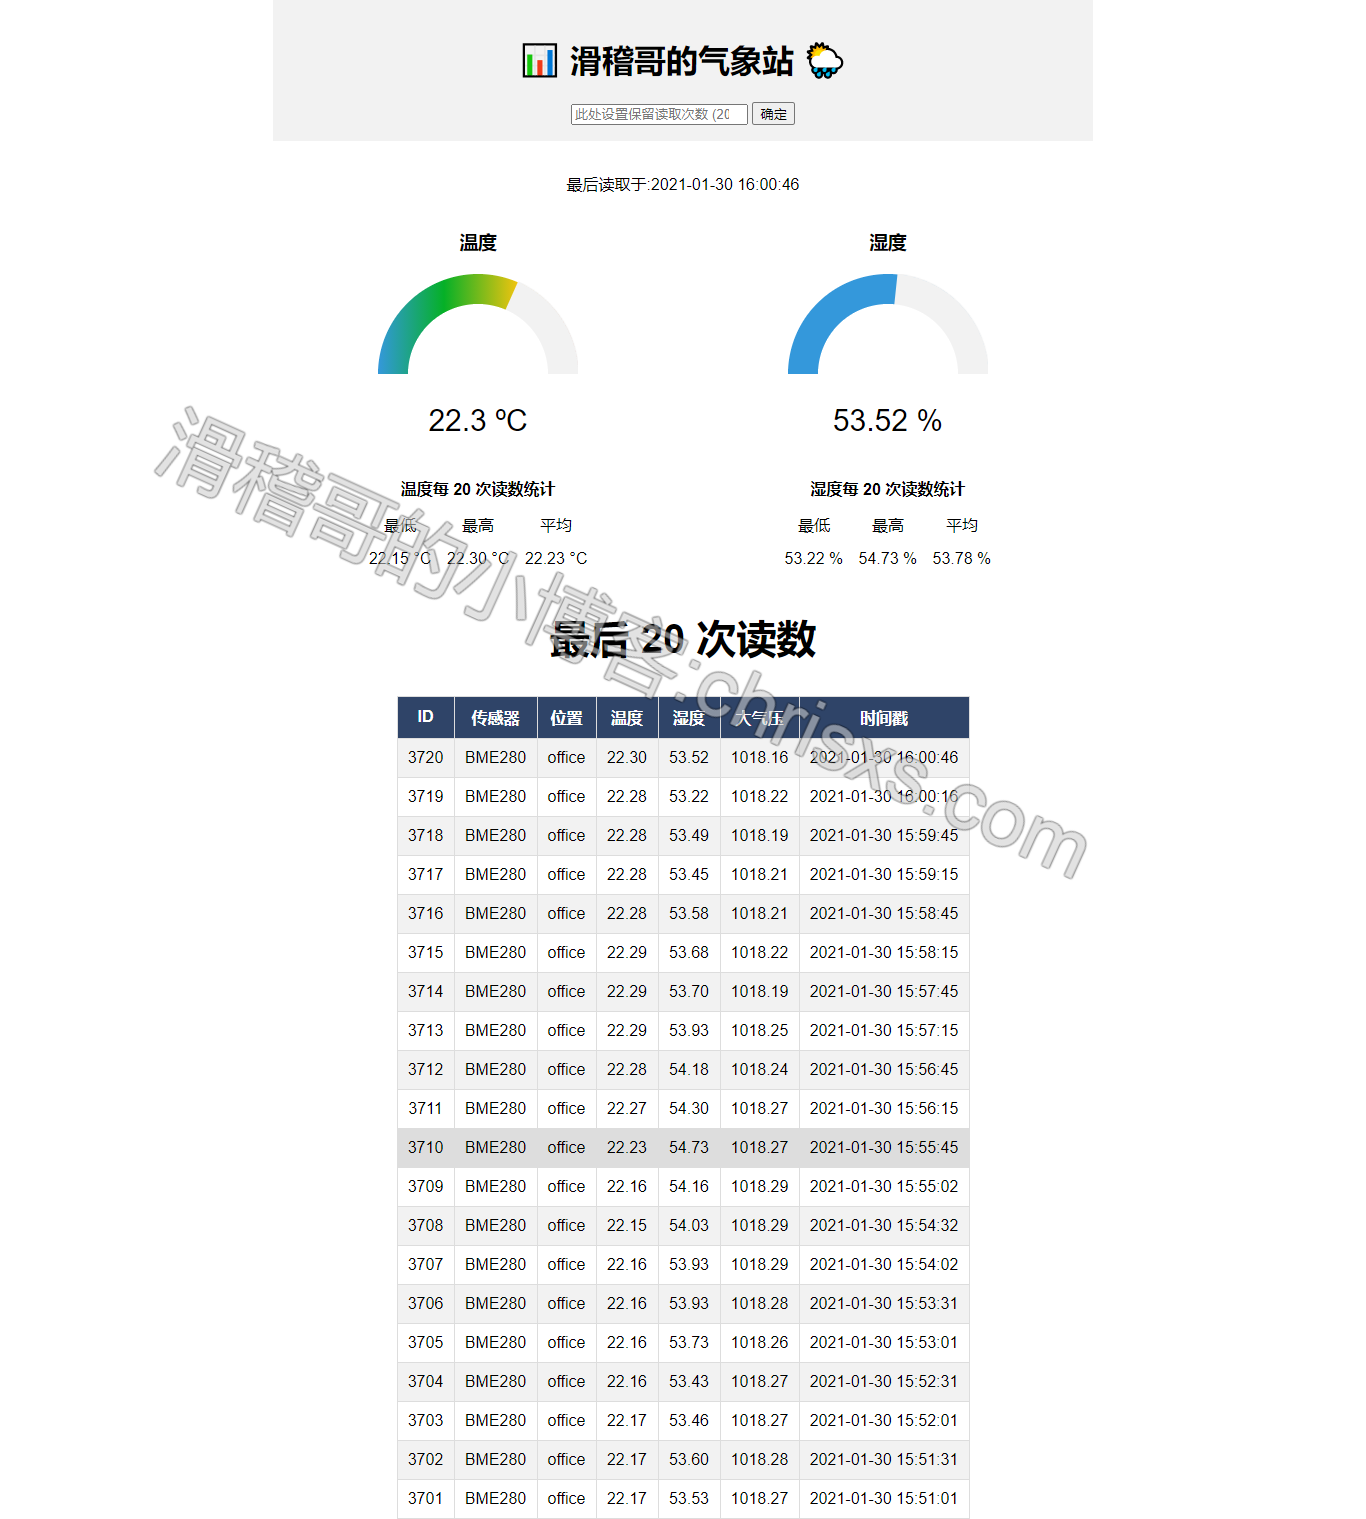 电脑浏览器效果
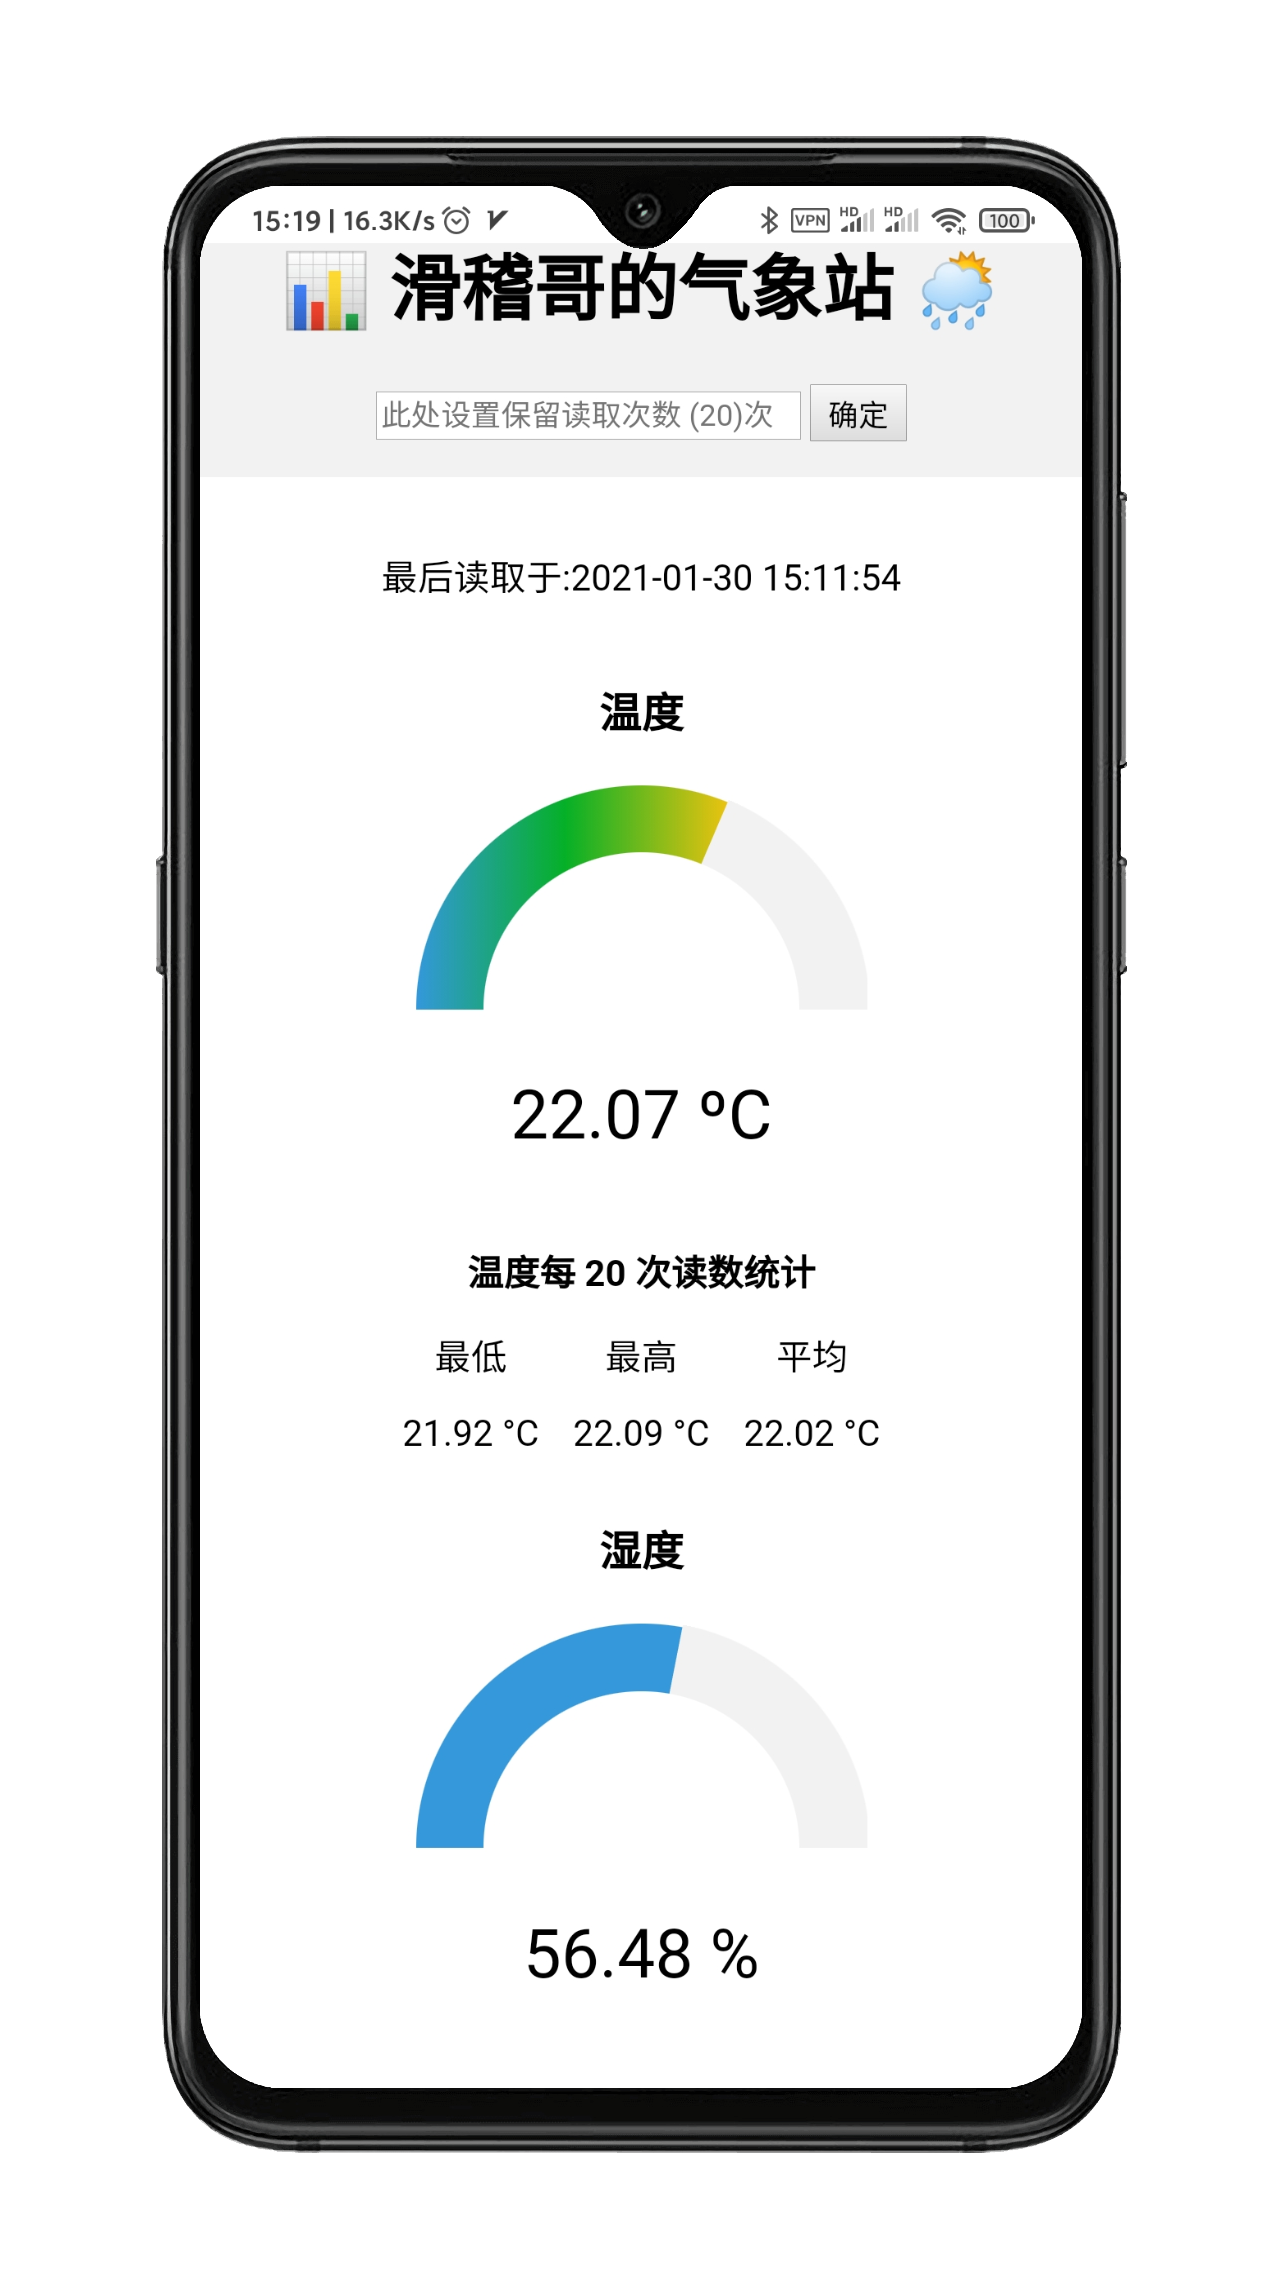 手机页面效果
补充与说明
Arduino代码
- 可以设置你可能想要更改的变量(
apiKeyValue,sensorName,sensorLocation) apiKeyValue只是可以修改的随机字符串。此例中是出于安全原因使用它,因此只有知道你的API密钥的任何人才能将数据发布到数据库- 本文代码在
loop ()中,实际上是每10分钟发出一次HTTP POST请求,并获取最新的BME280读数,而再本文开头的原理流程如图中则是30秒一次,这里可以根据自己需要在代码中修改. - 可以注释上面连接所有BME280读数的
httpRequestData变量,并使用下面的httpRequestData变量进行测试:
String httpRequestData = "api_key=tPmAT5Ab3j7F9&sensor=BME280&location=Office&value1=24.75&value2=49.54&value3=1005.14";
PHP
- 在
esp-weather-station中的这句:
由于我使用了谷歌的jquery,建议没有FQ的朋友自己替换成国内的,这里推荐一个:http://lib.sinaapp.com/js/jquery/1.9.1/jquery-1.9.1.min.js, 具体可以百度国内可用的jquery.

